ASSETS
The Assets page is a comprehensive tool designed to help you manage and track all your assets effectively. Here, you can view detailed information about each asset, add new assets, and ensure all assets are maintained in optimal condition.
Below is a detailed guide to help you navigate and utilize the assets menu effectively.
Key Sections:
- Add Asset
- View/Edit Asset
- Create Work Order from Asset Page
- Import Assets
Add an Asset
Click on the 'Add Asset' button located on the top right to create a new asset in the system. This will open the Add Asset form.
Step 1: Fill in Asset Details
- Upload image: You can drag and drop image file into the box or 'click to Browse' to choose a file from your computer.
- Asset*: Enter the name of the asset
- Description: Provide a detailed description of the asset, including any specifications.
- Type: Specify the type of asset (e.g., machinery, equipment, software).
- Category: Select the category from the dropdown menu (Categories created in Administration > Categories).
- Serial Number: Enter the unique serial number (if available) of the asset.
- Model: Enter the Model name or number of the asset.
- Manufacturer: Specify the manufacturer of the asset.
- Alarmed?: Set the alarm status of the asset
- Location: Click on blue icon to open the tab with list of locations and their respective sublocations to choose from.

*- Required Fields
Locations Tab:
You can expand any location to see its sub-locations, click on the location you want to choose and click 'Select'.

Step 2: Users and Teams (Optional)
- Fill in mandatory details on Step 1 and click on 'Proceed' to go to Step 2.
- Click on 'Add User' or 'Add Team' button to select users/teams from the list.

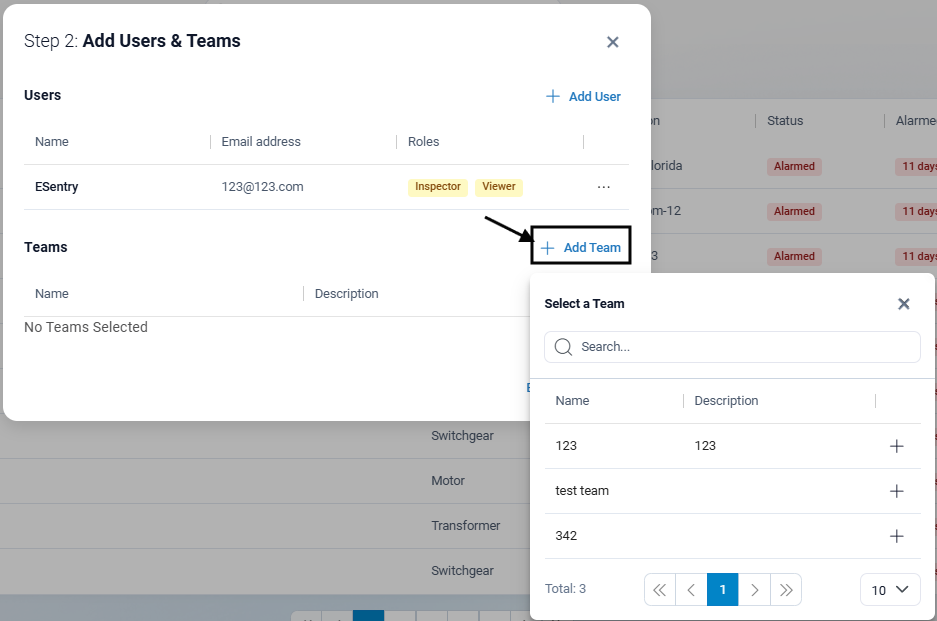
You can click on the '...' next to the user/team to delete from asset.

Step 3: Attach Files (Optional)
- Click 'Proceed' on Step 2 to go to Step 3.
- Click ‘Add a File’ to upload documents from your computer. You can either drag and drop a file or ‘Click to Browse’ to find a file on your computer and upload it.

Note: We currently support all file formats. Any changes in the future will be notified.
View Asset
You can click on any asset in the list to see more details about the asset and create a work order for the asset directly.
You can view a total of 6 tabs when you view an asset. 1. Details: Here you can view the information about the asset such as its description, serial number, the status of its alarm, etc.2. Users and Teams: You can view the users/teams assigned to this asset (if any).
3. Work Orders: All work orders (open/completed) assigned to the asset can be viewed here. Click on the 'eye' icon next to the work order to view more details about the tasks attached to the work order.
4. Files: Any files associated with the asset can be viewed here.
5. Routes: If the asset is assigned to any active route, you can view the details here.
6. Notes: This can be used as a means of documented communication between the administrator and field operators regarding the asset.
7. Sensors: Here, you can view the reports from the sensors added to the asset (if any).

Edit Asset
To ensure information in your asset inventory remains accurate and up-to-date, you can easily edit asset details.
Check the box next to the asset you want to edit. Click the options(...) menu in the row and select 'Edit' from the dropdown menu.

You can also open edit mode by clicking on the required asset and selecting 'Edit' on the top right of the tab.

When you enter edit mode for an asset, only certain tabs are available for modification. Here's what you can do in edit mode.
1. You can update fundamental information about the asset to keep it accurate and relevant.
2. You can add or remove users and teams associated with an asset.
3. You can view all the work orders associated with the asset.
4. You can view, add or remove files attached to the asset.

Click on the delete icon to remove the file from this asset.
5. You can view previous notes(if any) about the asset and add more comments if needed.

Once you click 'Submit', the new note is added with the account user's name and timestamp.
After reviewing/making changes to the asset, click on 'Update' on the bottom right of the menu to save changes.
Create Work Order from Asset Menu
You can create a work order from asset 'view' page directly. When you find out that the asset might be alarmed, or you find any notes from the field operators about the condition of the asset prompting for a work order.

Click on the asset and click 'Create Work Order' which will redirect you to the Work Orders page with the Work Order form opened on the right.

You would then fill out work order details and add tasks as required. You can review Create a Work Order section for more detailed explanation.
Import Assets
The import asset feature allows you to add multiple assets quickly and efficiently by uploading a CSV file.
To do this, click on the options(...) menu on the table header row located on the next to the "Alarmed Timer" column header to open the dropdown menu and select "Import" from the options.

A file upload dialog opens asking you to browse and select the desired CSV file. Choose the CSV file from your computer that contains the asset data you want to import.
Ensure your CSV file has the following columns:
1. Name
2. Description
3. Serial Number
4. Type
5. Model
6. Manufacturer
After selecting the file, a confirmation dialog will appear, asking you to confirm the import of assets.

Review the number of assets to be imported and click 'Yes' to proceed or 'Cancel' if you need to make changes. Once the import is complete, navigate back to the Assets page to verify that the assets have been successfully added to your inventory.
Tips for Using Assets Menu
- Quickly locate specific assets by using the search bar to enter keywords related to the asset's name, type, category, location or status.
- Update asset information to ensure all relevant data is up-to-date and accessible to the right personnel.
- Easily access Work Orders attached to a specific asset.
- Save time by using "Import" feature to add multiple(up to 1000) at once via a CSV file.
- Keep a detailed log by adding comments or observations in the "Notes" tab. This can include maintenance history, performance issues or any relevant updates.
Was this article helpful?
That’s Great!
Thank you for your feedback
Sorry! We couldn't be helpful
Thank you for your feedback
Feedback sent
We appreciate your effort and will try to fix the article